If you are a beginner to yoga, you are probably limited by wrist pain in both "All 4s" (i.e. Hands and Knees) and Downward Dog. And as you have found out, yogis love Downward Dog. So here are some tips about how to ease some of that pain while bearing weight on your hands.
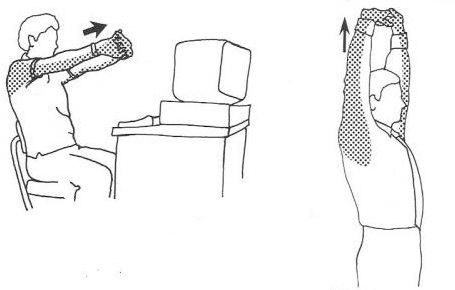
First, you feel it in the wrists because you do or have spent much time with flexed fingers while typing at the computer. The tendons of the finger flexor muscles cross the wrist and the muscle bellies are in the forearm. So during the day, take frequent breaks to stretch those wrists. Interlace your fingers and push your palms away from you and take 5 deep breaths. If you feel OK with that, then take your arms overhead, reaching those palms to the ceiling and take 5 deep breaths. Ten deep breaths should take you about 1 minute! Try to incorporate this motion into your day 6 times (yep, only 6 minutes). Use some prompt (like sending an email) or set your timer each hour to remind yourself to take this stretch break.
I teach these moves and more in my Work Day Yoga Workshop!
Next, when in All 4s, notice the angle of your hand to forearm. I cue this angle to be 90 degrees. But for some, this is too much tension and creates pain. So just walk you hands forward to decrease this angle. It is OK to do Cat/Cow and Arm Balance in this position. Over time (expect 2-3 months), you will feel the tension release in your wrist, and you can move the hands back under the shoulders.
Use this same position, with hands forward in relation to the shoulders, to start moving into Downward Dog. Tuck the toes, lift the tailbone slightly and lift the hips up and back. Keep the knees bent and the ankles off the floor and really push into your hands to take your body weight back to your legs. They are stronger and can take it much more than your arms! The motion at the wrist is flexion, but you are isometrically pushing into the mat. This will cause your weight to move back. Reach the arms overhead as your torso moves back and shoulder blades move toward your ears. Keep that lift in your tailbone and elongate your entire spine. You can keep your knees bent if your hamstrings (back of the thighs) are tight. Or you can straighten the knees. Just don't let that motion push your weight forward onto your hands. In the picture below, look at the wrist position in 2-4. See the neutral position with almost no wrist extension!

I use this 4 step approach to teach Downward Dog. But you can stop at #3 with knees bent.
If you are a visual and kinesthetic learner and would rather see me demonstrate All 4s and Downward Dog, click on the video link below.
Let me know how this feels. Namaste,
Stephanie